CS0500 Github Guide
We use GitHub and git to give you access to project code, to allow you to save your work online so you can access it from anywhere, and to facilitate collaboration on partnered work. In CS500, we will be expecting you to access git through the terminal/command line and through GitHub. GitHub does have a companion app, but we do not recommend you use it and will not be able to support you in making it function.
What is GitHub?
GitHub is a code-hosting platform that is used by many programmers to save their code and access it from any machine. Think of it like “the cloud” but for code projects! This guide is your go-to resource for help with GitHub/git setup as well as git commands you should know in order to interact with GitHub from your local machine.
Making an Account
First, you’re going to need a GitHub account which will be an invaluable resource to you for the rest of your computer science career (both at Brown and beyond). To create an account:
- Go to www.github.com
- Select “Sign up” in the upper right corner
- Follow the steps on the website to get your account all set up :)
Installing Git
Thankfully, installing git on your computer is super easy! First, we need check if you already have git installed on your computer. To do this, we’ll need to use a terminal, which is how you’ll primarily interact with git. If you haven’t used a terminal much before, that’s okay! You’ll gradually learn more in this course and others, starting now!
To open a terminal and check if git is installed:
-
First, open the terminal on your computer:
-
On Mac: Go to Applications > Utilities > open Terminal
- (Alternatively, you can open Spotlight Search (keyboard shortcut is “Command+Space’’), search for “terminal”, and open the first application listed)
-
On Windows: Open the Search bar, enter “command prompt”, and click the first application listed
-
-
Enter the command
git --versionand press Enter
If you already have git installed, your terminal should print the version you have (the version you have shouldn’t matter, as long as you have it installed). You can ignore the rest of this section.
If get some error like “command not found”, you need to install git. To do this, expand the instructions below:
Instructions for MacOS (click to expand)
- In your terminal, enter the command
xcode-select --install
This will download a set of recommended development tools from Apple, including git. If you want to install git another way, look here. - Follow the prompts to finish the installation. The process may take several minutes.
- Verify you have Git installed by running
git --versionin your terminal again. You may need to quit and reopen your terminal for this to work.
Instructions for Windows (click to expand)
- Go to this page. This should prompt an automatic download of git, but if not, click the link to manually download git.
- Open the .exe file you downloaded and click next through each of the installation pages—there is no need to adjust any settings, all the defaults are fine.
- Verify you have Git installed by running
git --versionin your command prompt again. You might need to quit and reopen your the command prompt window for this to work.
Configuring git settings
Next, we need to to connect git on your computer to your GitHub account. To do this:
-
In your terminal, enter the command
git config --global user.email "<email>", where<email>is replaced with the email you used to make your GitHub account (don’t forget the quotes!). -
Enter the command
git config --global user.name "<name>"where<name>is replaced with your username (don’t forget the quotes!).
When you enter each command, you shouldn’t see anything print in your terminal—this is expected. Git is configuring itself behind the scenes! (Often, terminal programs don’t print anything when they run successfully—many only print a message when something goes wrong.)
Documentation tip: A common convention for software (which we will follow in CS500) is to write commands like this:
some_command_here <parameter>The <angle brackets> indicate that parameter is a placeholder for you to fill in—the documentation will tell you what to put there. When you fill in the placeholder, don’t include the angle brackets—they are just notation to tell you it’s a placeholder when reading. So, if you were supposed to write “cabbage” for parameter, you’d type in:
some_command_here cabbageKeep this in mind as you read this and other documentation!
Creating your Github access token
When you use git to connect to Github, you need to provide credentials to Github to prove you are the user you claim to be. To do this, you can create a Personal Access Token—this is similar to a password, but more commonly used when a program (eg. git) is logging in on your behalf (rather than asking you to type a password).
Note: If you had a GitHub account before, you may have used a password-based authentication. This is no longer supported, so you also need to follow the steps below!
To create your github Personal Access Token, do the following:
-
In the page that opens, scroll down to the very bottom left and click on Developer Settings, which looks like this:

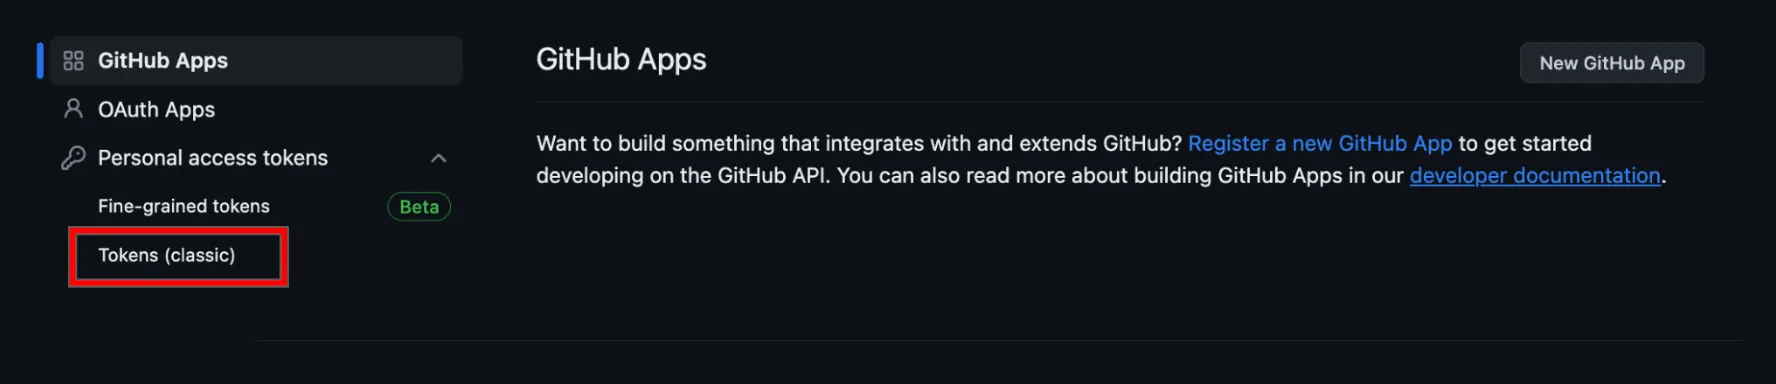
- In the Developer Settings page, look at the sidebar on the left and click on Personal Access Tokens > Tokens (classic), like in the red box below:
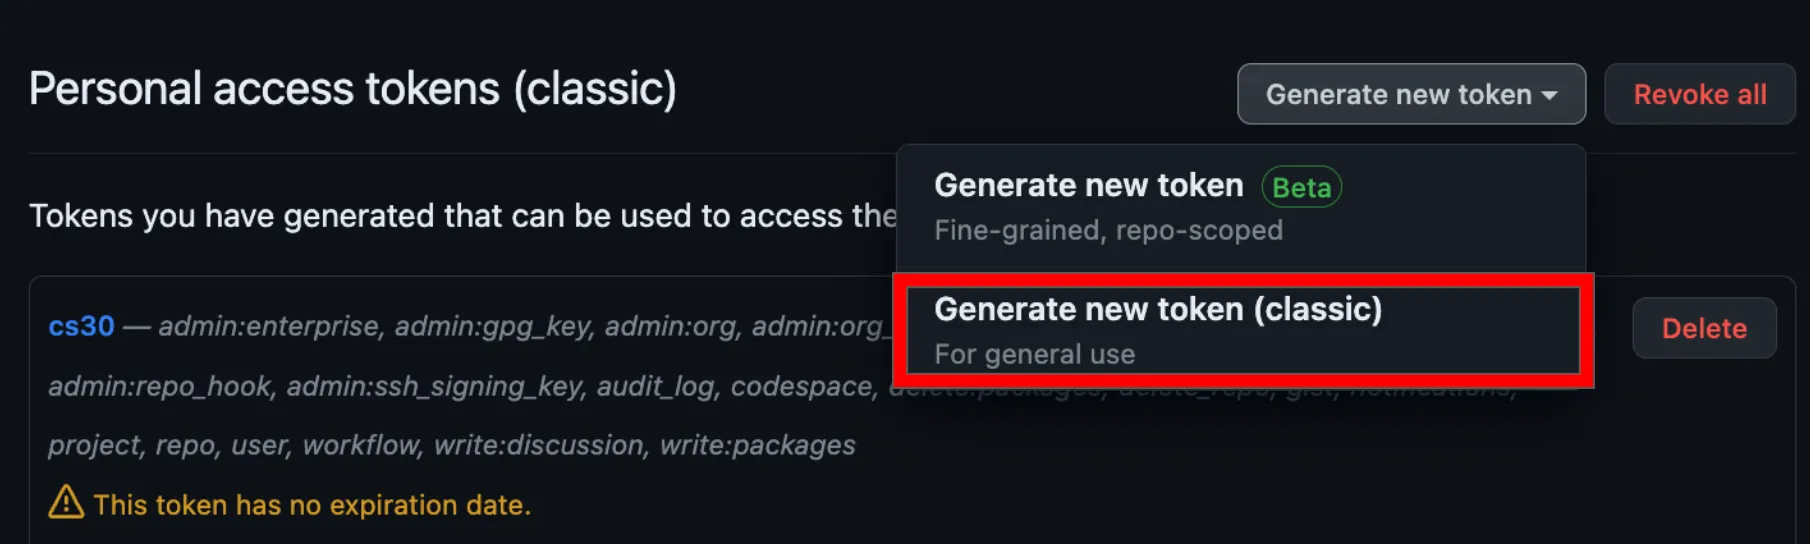
- After clicking on Token (classic), you should see the following screen. Click on Generate new token > Generate new token (classic). Be sure to pick the classic token!
- Then, you should see a window that looks like the image below. Make sure to fill in all of the following options as shown in the image:
- Name: This is the name of your token—you can name it whatever you want (eg. “cs500”).
- Expiration: Select “No expiration”. You can ignore the warning from Github.
- Select scopes: Select the “repo option. This will check several other boxes under “repo”.
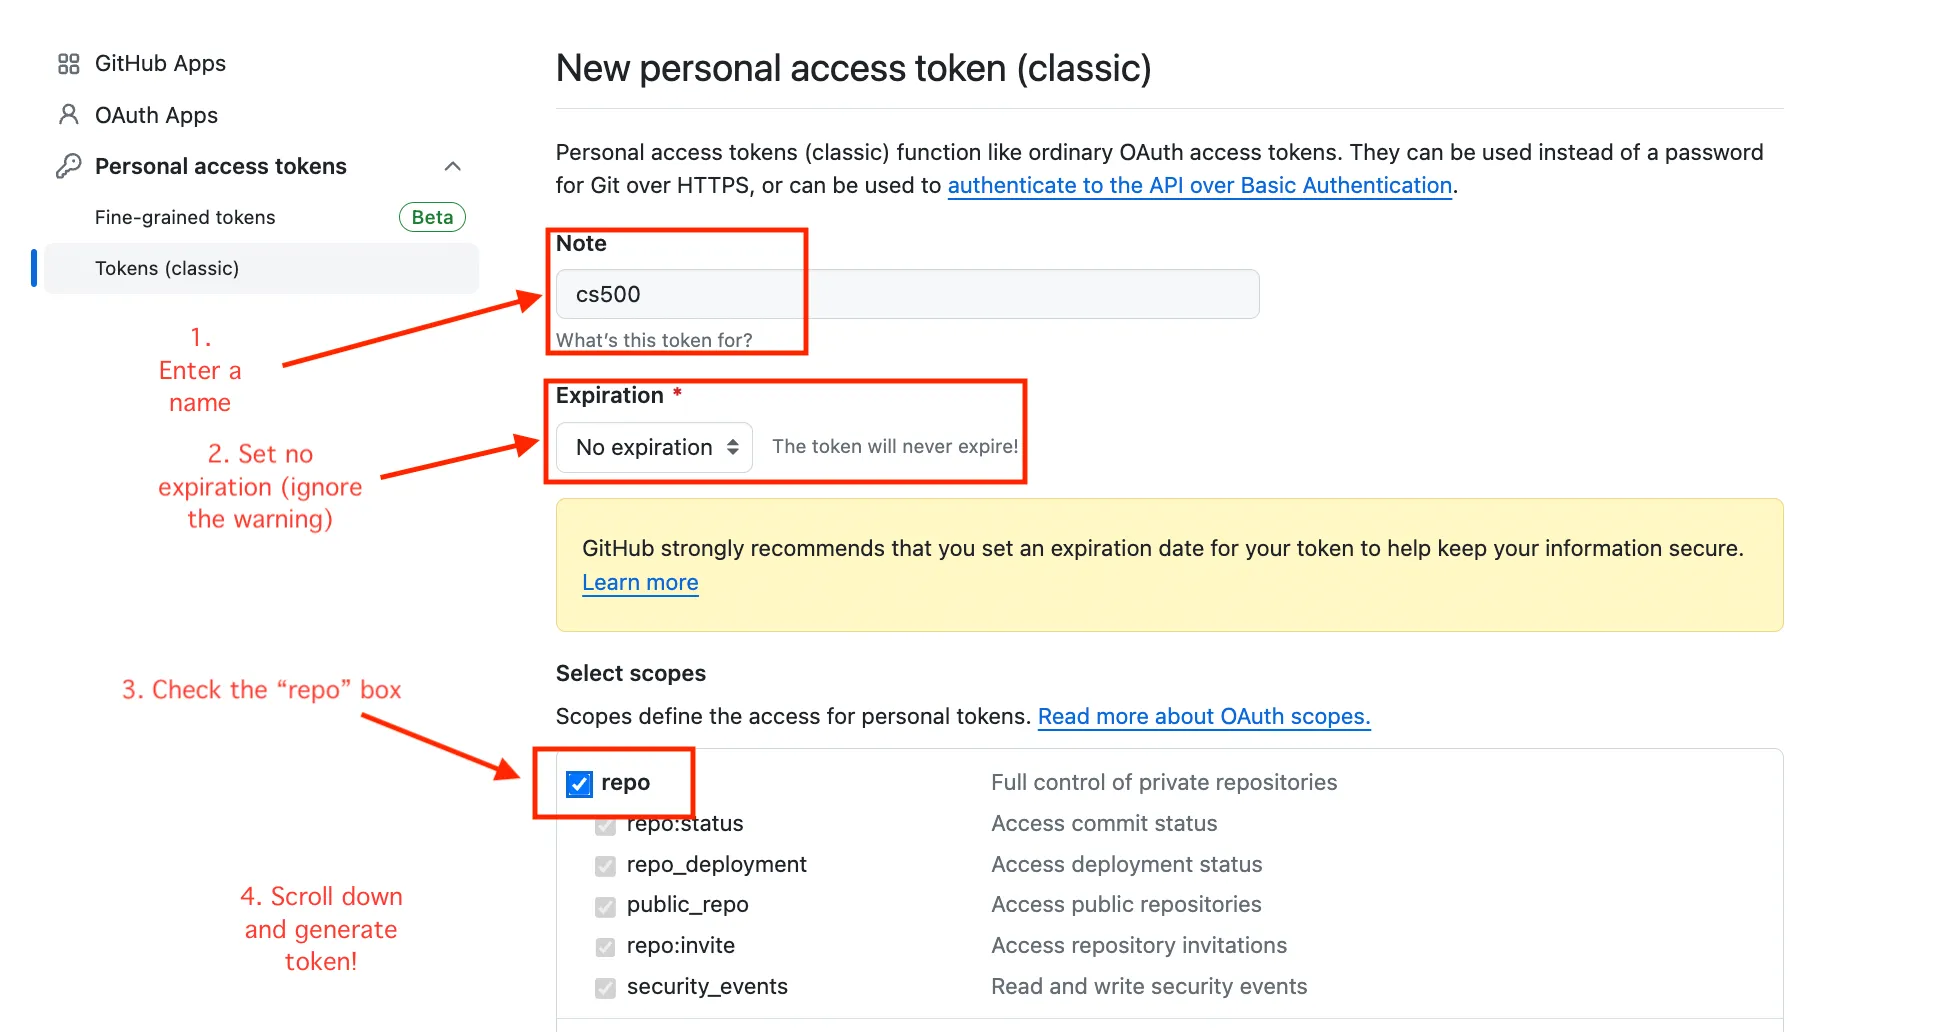
- Take a moment to double-check that you have filled in all the settings as on the figure, then click Generate Token.
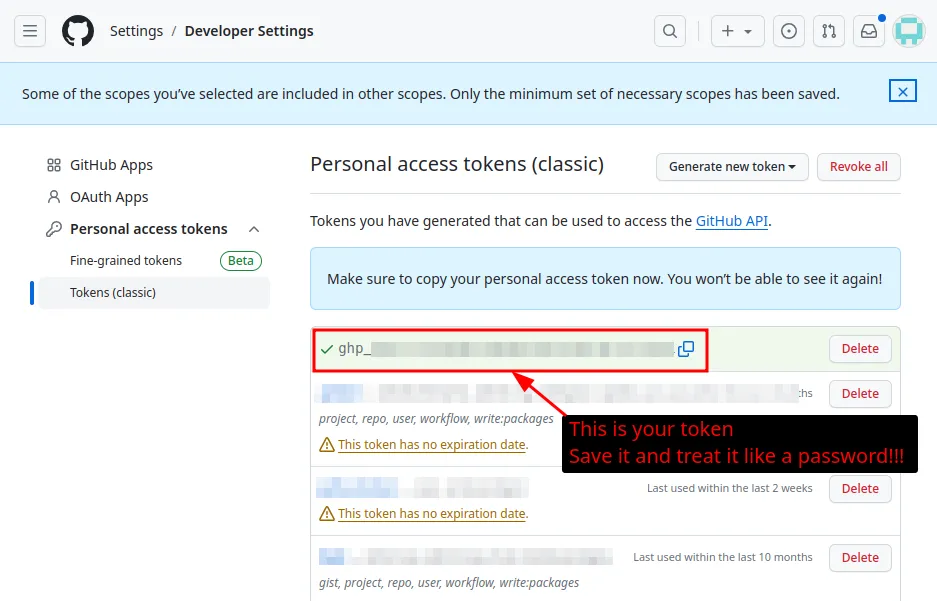
After you generate your token, you should see a page like this:
-
Your token is a super-secret value like a password—you’ll enter it when closing repositories. Copy this token and save it somewhere safe you can access it later.
-
One final step: we can configure
gitto remember your token the first time you clone a repo (you’ll do this later), that way you hopefully won’t need to enter it more than once. To do this, enter the following in your terminal:
git config --global credential.helper storeOnce again, this command won’t produce any output.
Great job! You should be all set for authenticating your Github account for this class. Now you’re ready to clone repositories!
If you’re reading this guide for the first time, take a look at the terminology in the next section, then go back to continue with your IDE setup. You’ll use git again to before you start running code!
Git terminology
Before you start using git, here is some important GitHub terminology you should familiarize yourself with:
- Repository → a GitHub repository – or repo for short – is what a project on GitHub is called. Each time you accept an assignment for CS0500 by clicking on the assignment link, GitHub will create a repository for you for that project.
- Commit → The cool thing about GitHub is that it can keep track of all of the versions of your project as you edit them. Each project “version” is called a commit. It is basically a snapshot of your project at a moment in time, and it is up to you to create commits when you reach points in your project that you do not want to lose. (Your project will be saved on your local machine, but in order to save a snapshot on your GitHub, you must create a commit and push it to your GitHub). It is good practice to create commits regularly so if something gets messed up while you are coding, you will have old versions to look back at stored on your GitHub repository.
The next few sections describe some common tasks you’ll do using git—the other course documentation will tell you when you need these, but remember that they’re here in case you need them.
More git resources
For more info about git, we recommend checking out the following links:
- Git - The Simple Guide: a quick and dirty introduction
- Harvard CS61 intro to git: a nice pictoral reference
- Git handbook: an in-depth introduction
Common git tasks
This section outlines some common tasks for working with git. As you work on other assignments, we’ll refer you to these sections as you need them:
- How to clone a git repository?: you’ll do this once for every project
- How to push your code to Github?: you can do this to save your work on Github, and to collaborate with others on the partner projects
- How to create a Personal Authentication Token?: you’ve already done this, but look here if you need to create another token
Cloning a git repository
Cloning a repository is how you download code to your computer. Depending on the assignment, there are two ways we might give you code to run, which changes how you will clone it:
- For Homework/Project/Lab stencils, we will give you a Github Classroom link (eg.
https://classroom.github.com/<something>). To use these, see Accepting Github Classroom Assignments - For HW, lecture code, or other examples, we will directly provide a direct Github Repository URL (
eg. https://github.com/<something>). To use these, see Cloning from a Repository URL.
Accepting an Assignment on GitHub Classroom
Github Classroom links allow us to set up a unique repository to hold your code for an assignment or project. To use it:
-
Accept the assignment on GitHub Classroom by following the link on the handout and clicking the “Accept this assignment” green button.
-
Github will now create your repo–wait a few seconds and refresh the page. When it’s done, you should see a link to your shiny new Github repository (like the example below), click this link to view it!
This link will open the main view of your repository on Github. Next, we need to download (or clone, in git terms) the repository to our system: to do this, see the next section.
Cloning a repository by URL
Once we have a link to a repository, you can download it to your computer by “cloning” the repository into your CS500 folder with git. To do this:
- If you have not done so already, open the repository link in your browser.
- On the Github page, click the green “Code” button and click the copy button to copy the link.
Getting to your CS500 folder
To clone the repo, we’ll need to use the terminal to browse to your CS500 folder and run git to download the code. If you’re new with using a terminal, that’s okay! Follow the steps below for a step-by-step guide. Even if you’re more comfortable using a terminal, skim all of these instructions to make sure you understand the process–you might learn some useful shortcuts!
-
First, open the terminal on your computer:
-
On Mac: Go to Applications > Utilities > open Terminal
- (Alternatively, you can open Spotlight Search (keyboard shortcut is “Command+Space’’), search for “terminal”, and open the first application listed)
-
On Windows: Open the Search bar, enter “command prompt”, and click the first application listed
-
Quick intro to terminals
Just like when you browse folders in a window on your computer, in a terminal, there’s a concept of a current “working directory”, which is the folder where the terminal is “looking” at one time. The working directory is usually displayed in the terminal’s prompt, which is the line where you enter commands.
To see the current working directory, enter the command pwd, like this:
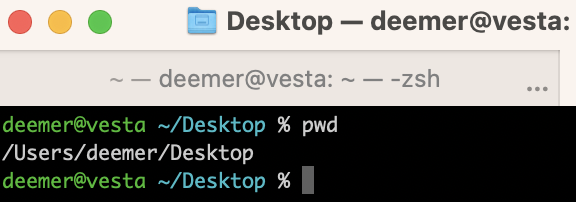
Here, the working directory is the user deemer’s Desktop folder.
Another way to write this is ~/Desktop, where ~ is shorthand for a user’s home folder.
- Next, we need to navigate to our CS500 folder in the terminal. There a few ways to do this—use whichever you feel most comfortable:
Shortcut method (Mac)
- Outside your terminal, open up your CS500 folder in Finder (the standard file/folder browser on Mac)
- Drag the Finder window onto the Terminal icon on your dock (like the figure below). This should open a terminal already pointing to your CS500 folder! Pretty awesome, right?? 😎 (If this doesn’t work for you, just go with the classic method.)

Shortcut method (Windows)
- Outside your terminal, open up your CS500 folder the way you’d normally search for a file
- Inside the folder, hold down Shift and Right Click in the blank area in the folder view
- In the menu that opens, click “Open PowerShell window here”. (PowerShell is another terminal program inside Windows, similar to command prompt.)
If this method doesn’t work for you, just try the Classic method.
Classic Method
- In your terminal, use the
cdcommand to enter into your CS500 folder. The command for this will depend on where your CS500 folder is located on your computer–here’s what it should look like based on the folder locations we’ve recommended, but you can adjust it if you picked a different spot:
- Mac (CS500 folder on Desktop):
cd ~/Desktop/CS500orcd "/Users/your-name-on-mac-here/Desktop/CS500" - Windows (CS500 folder on C: drive):
cd C:\CS500
For more information on using terminal commands, take a look at our Terminal Guide, which describes cd and other commands in more detail.
At this stage, you should now have a terminal open to your CS500 directory! Now we can finally clone the repository.
Cloning the repository with git
Next, you can download the repository to your computer–in git, this is called “cloning” the repository. To do this:
-
Enter the following command using the link you copied from Github.
git clone <pasted link>(without the “<>” brackets) -
If you are prompted to log in, enter the following:
- Username: Enter your Github username (not your Brown username)
- Password: Paste in your Github Personal Access Token (eg.
ghp_XXXX...). If you don’t have one, see these instructions. (Note: you won’t see the password in the terminal as you paste/type it—this is normal, just paste and press enter.)
After you log in successfully, you should see output something like this:
  Cloning into '<name of repository>'...
  remote: Enumerating objects: 39, done.
  remote: Counting objects: 100% (39/39), done.
  remote: Compressing objects: 100% (33/33), done.
  remote: Total 39 (delta 8), reused 37 (delta 6), pack-reused 0
  Receiving objects: 100% (39/39), 372.97 KiB | 6.32 MiB/s, done.
Resolving deltas: 100% (8/8), done.- If your output looks like this, your repository was cloned successfully, yay! If you see an error saying
ForbiddenorAccess denied, make sure you are using the Github Access Token you created
Once you have cloned the repository, you should now see a folder in your CS500 with the same name as the repository you cloned. This is where the code lives!
To continue working with the code, you’ll need to open the repository in an environment such as VSCode.
How do I push my code to Github?
If you want more information on what the actual commands do, then go to the Need to Know Commands section that goes through the commands needed to git push. However, here is a step-by-step guide with pictures that allows you to push your code to Github.
-
After you have made some changes, navigate to your terminal at the bottom of IntelliJ/VSCode. Additionally, make sure that you are in the same directory as your project/homework/lab.
-
Next, type in the following command:
git add .(make sure that there is a space between theaddand the period). There should be no output after. -
Next type in the following command:
git commit -m "message"where the particular message is the message for your git commit. For example, since I edited myAttributeNodeclass in my Decision Tree project, I can type in the following commit message. Additionally, you can see the files that you have changed, the insertions that you made, and the deletions that you have made in the commit log. -
Next type in your
git pushcommand.
Appendix: Helpful git commands
| Command | Explanation |
git clone <repo URL> | Once you accept an assignment and your repo is created, click the green “Code” button and copy the link that is listed. That link is your repo URL. Then, in your terminal, type this command with the repo URL to make a folder with the code in your repo on your computer. The folder will be made in whichever directory you are currently in, so be sure to cd into your desired directory before running this command! |
git add <file>``git add -A | This command is the first of 3 commands that you need to run when you are trying to get the code you wrote on your computer back up to GitHub. You must add the files that you want to update on GitHub. You can do this by running git add with one file specified at a time, or you can use git add -A to update all files (typically what is used when you want to save a snapshot of your current code). |
git commit -m “<message>” | Once you have added all of the desired files using git add, you are ready to commit these changes and save your snapshot to GitHub! This command is the 2nd of 3 commands you must run to get your code edits back up to GitHub. It creates the commit, or “snapshot” that we will soon send to GitHub. Instead of <message>, you should write something informative about what you’ve changed! |
git push | Now you’re ready to push the changes to GitHub! Running this command will send your commit to the online repository where your code is stored. This is the final of the 3 commands you will run to get your code back to GitHub! After running this, go on your GitHub repo and ensure that your updates were made! |
git pull | This command lets you pull any changes on this repository that are present on GitHub but not on your local machine. No need to worry about this for solo projects, but if you’re working on partner projects, pull before you begin working / after you commit and before you push in order to get all your partner’s changes! |
If you have any git problems, feel free to post on Ed!
Please let us know if you find any mistakes, inconsistencies, or confusing language in this or any other CSCI0500 document by filling out the [anonymous feedback form].